Blogs > Mission: Pinpossible

Nicole Franz is a copy editor and paginator at The News-Herald in Willoughby. She takes all those sweet recipes, grueling workouts, cleaning tips, money-saving tricks, do-it-yourself projects and looks that seem so cool on Pinterest and writes about how they really turn out.

Wednesday, November 14, 2012

Parmesan Broccoli Mashed Potatoes is two-for-one side dish delight


Everyone loves a two-for-one deal. Seriously, who can turn down a good buy one, get one free sale? This pin for a scrumptious-seeming Parmesan Broccoli Mashed Potatoes side dish certainly had that same twofer appeal rolling the starch and veggie side dishes into one, and I was helpless to resist.

The pin links to a foodgawker post (and in case you’re unfamiliar with foodgawker, it’s basically food porn with links to recipes), which directs you to this One Lovely Life blog post. The blog is done by this lovely couple (see what I did there?) named Emily and Michael who have put together a visually stunning blog that mostly focuses on food, but sprinkles in bits about their lives and their adorable daughter. Their recipeindex is extensive and sorted into 23 helpful categories like “Breakfast & Muffins,” “Pasta & Rice,” “Main Dishes: Chicken & Turkey,” and “Main Dishes: Meatless.”

Ingredients

4-5 medium potatoes, peeled and cut into small pieces (about 1½”)
2c broccoli florets, uncooked
4 Tbsp butter
½c milk
½c fresh parmesan, grated
salt and pepper to taste (I used about 1 tsp salt, ½ tsp pepper)

Instructions

Bring a large pot of salted water to a boil. Add potato pieces and broccoli and boil 15-20 minutes, or until potatoes are very soft and can easily be mashed with a fork. Drain broccoli and potatoes well.

All ready to mash
Place drained vegetables in a large bowl with butter, milk, and parmesan. With a hand mixer, whip mixture until very smooth. Add salt and pepper to taste (I used about 1 tsp salt and ½ tsp pepper).

Serve warm.

How it went

“Bring a large pot of salted water to a boil.” I’m pretty sure even my dad could handle this part of the recipe without any trouble, and he doesn’t really do any cooking that doesn’t involve a microwave or grill. No further comments here.

“Add potato pieces and broccoli and boil 15-20 minutes, or until potatoes are very soft and can easily be mashed with a fork.” This step definitely topped the 20-minute mark for me. I ended up using five potatoes and two cups frozen broccoli florets, so I’m pretty sure this extended the cooking time.

“Drain broccoli and potatoes well.” Well my trusty blue colander made this one easy work.

“Place drained vegetables in a large bowl with butter, milk, and parmesan.” I used margarine instead of butter (I’m on a budget, here), skim milk, and the shredded parmesan cheese that comes with a green lid in grocery stores everywhere.

“With a hand mixer, whip mixture until very smooth.” For this one, I busted out my mom’s trusty hand mixer, which I inherited when I moved out post-college. It’s got a solid 10 years on me, but it’s still in excellent shape and could probably mix circles around the hand mixers made today. Having used this mixer hundreds of times to great success, this is where I got a bit thrown off. I could not for the life of me get this mixture “very smooth.” So after minutes and minutes as another recipe burned in my oven (I’ll blog about that later), I settled on fairly lumpy.

“Add salt and pepper to taste (I used about 1 tsp salt and ½ tsp pepper). Serve warm.” I probably flipped the quantities here, definitely leaning toward more pepper and less salt, because my dining companion isn’t much for salt (seriously, you’d think a guy who owns two salt shakers would be more into salt).

The finished product, lumps and all.

Results

This one was a hit with my friend and I. It’s got this great creamy texture to it (even with the lumpy bits) that instantly reminds me of homemade mash potatoes and family dinners and holidays. This flavorful dish isn’t a super veggie-tasting dish, which would be great for getting picky eaters to eat veggies. The strongest flavors that come out are parmesan cheese, then a blend of the broccoli and mashed potatoes. I’m sure the broccoli flavor would have been more powerful if I’d used fresh broccoli, but this dish definitely tastes exactly like it sounds it would with a name like Parmesan Broccoli Mashed Potatoes.

I’m a big broccoli lover and a serious fan of potatoes, so I usually have both on hand (Re: making Gwyneth Paltrow No Fry Fries). That combined with the easiness of this recipe and its crowd-pleasing two-for-one appeal should make this an easy repeat in my kitchen.

Honestly, I think this is another recipe that could be adjusted by switching out the parmesan cheese for cheddar, mozzarella, or some other cheese of your preference. You could probably leave the cheese out entirely if you want to cut the dairy factor a bit.

Check One Lovely Life out on Twitter at @onelovelylife and don’t forgot to check out Emily and Michael’s blog at www.onelovelylife.com. 

And I'm sorry they are not more pictures, I was juggling/burning another recipe and trying to finish up a batch of cookies, too.

— Nicole Franz | NiFranz@News-Herald.com | @FranzOrFoe
Follow my Mission: Pinpossible board on Pinterest.

Labels: , ,

Monday, October 1, 2012

Gwyneth Paltrow recipe offer guilt-free French fries crazy easy to make

All sliced up and ready to go.
So I haven’t gone grocery shopping in a while, and was trying to come up with a Sunday afternoon pre-work meal that would fill me up for a night of editing and page design without making me feel guilty. I rummaged through my pantry and fridge and didn’t find too much that was striking my fancy. I did have potatoes though and remembered pinning something about a healthier french fries recipe recently.

So while I nuked some frozen vegetables in the microwave (I’m a big fan of frozen veggies as a snack/meal with some combination of cheese, spices or salsa) I found this pin touting Gwyneth Paltrow’s No-FryFries from her cookbook, “My Father’s Daughter: Delicious, Easy Recipes Celebrating Family & Togetherness.”

If you click on the pin it links you to Self and a full recipe, but again I went with what was on the actual pin.

What was the point of dunking them in water?

Instructions

"Gwyneth Paltrow's No-Fry Fries, just cut up your potatoes and place them in a bowl of cold water, then dry them off and toss them with olive oil, place them on a cookie sheet and sprinkle with sea salt, then bake at 450 for about 25 minutes, turning occasionally."

How it went

I grabbed two Idaho potatoes and scrubbed them down, which is much harder to do effectively without a scrub brush, but I digress. I turned on my oven before I tracked down a cutting board and knife.

I didn’t skin my potatoes, because it didn’t say to on the pin (though it does on the Self recipe), so all I had to do was hack up the potatoes into fry-shaped strips. I cut the potatoes in half first to facilitate easier cutting.

Then I tossed the potatoes in a Rubbermaid container that I knew had a lid and added enough water to cover them. I’m not entirely sure what this step did, unless it was meant to clean the potatoes further. 

Seriously, was this for cleanliness? I already scrubbed the potatoes.

I went a tad overboard on the olive oil.
Then I drained out the water and tossed the potatoes on some paper towels so I could pat them dry with another paper towel.


I dried out the container I just had the fries in and dumped them back in there along with about 3 tablespoons of olive oil. I put the lid on and shook the potatoes up until I felt they were solidly mixed (a few healthy shakes).

I decided I wanted to be super lazy and put aluminum foil over my cookie sheet, which I sprayed with non-stick cooking spray. Then I fished the potatoes out of the container with a slotted spoon so I wouldn’t end up wasting a ton of olive oil (that stuff’s expensive!) on the cookie sheet.

I arranged them haphazardly on the sheet and then tossed a bit of sea salt on them.

Oiled up and ready for the beach (or my oven).
I placed them on the middle rack of my oven and promptly forgot about them for 25 minutes. The pin says to turn them occasionally (how vague is that?), but I didn’t bother.

They're so shiny!
I pulled them out after 25 minutes and tossed them on a plate for easy eating.

Results


Maybe I should have turned these, or perhaps taken them out a little earlier.
This was crazy easy to make. It required almost no effort, and the fries were a satisfying substitute for regular old fried french fries. Some of the fries turned out a little crunchier (read burnt) than I would have liked, but most of them were the perfect amount of crispy.

The water part and subsequent drying of the recipe seemed a little bit unnecessary and wasteful. I’d probably skip this step in the future and see how it goes.

I wasn’t sure how much olive oil to use and definitely overdid it on that part, but I ended up just tossing my veggies in the olive oil with some spices and a little Parmesan cheese and it ended up very yummy and not wasteful. The Self version of this recipe says to use 2 tablespoons of olive oil. That would probably have been a perfect amount, and I wouldn’t have felt the need to fish my fries out of the container with a slotted spoon.

I also overcooked them a bit (big surprise). I am eventually going to figure out how to bake things perfectly in my oven (and then I'm promptly going to move out of my apartment probably). 

I will definitely make these again, so kudos to Gwyneth Paltrow. I really enjoyed her turn as Pepper Potts in the “Iron Man” and “Avengers” movies, and she showed how multitalented she is with a turn on “Glee” and now this cookbook. Thanks to those distinctive roles, I’ve finally managed to not confuse her with Cate Blanchett.

UPDATE

Thanks to my college friend and Post colleague Emily Carroll I learned that the water removes excess starch and helps make the fries crispier. So apparently dunking the potatoes in water is a worthwhile step. (5:32 p.m. Oct. 1, 2012)

— Nicole Franz | NiFranz@News-Herald.com | @FranzOrFoe
Follow my Mission: Pinpossible board on Pinterest.

Labels: , ,

Sunday, September 2, 2012

Baked avocado fries are yummy alternative to fried snacks


I love avocados. They’re high in potassium, they have the “good fat” (whatever that is exactly), and they’re yummy. If they were consistently inexpensive they’d be a regular part of my diet, instead of an oooh-they’re-on-sale-so-I’ll-buy-four kind of item. 

I also crave greasy junk food from time to time (who doesn’t?), but I’m trying to be healthy and shed a few pounds. That’s why my eyes kind of light up when I see pins for foods that have that deep-fried/sugary/fatty look, but promise a healthier way to achieve the taste be it by baking, substituting ingredients, or whatever.

This pin for baked avocado fries might have actually made me salivate a bit. I love French fries dipped and avocados (so much fat!), but had never thought of cutting the potato out of the equation entirely. 

The pin actually refers you to this blog, which then refers you to another blog called Adventured in Cooking, where the recipe (and some pretty cute photos of the blogger’s baby son reside). Beth (the blogger), adopted a deep-fried avocado fries recipe from Circle B. Kitchen, another blog about food. Have I lost you yet?

I stuck with Beth’s recipe, which is exactly the same as the deep-fried version minus the canola oil and frying part.

Ingredients

1/4 cup flour
1 tsp kosher salt
2 large eggs, beaten
1 1/4 cups panko (Japanese bread crumbs)
2 firm-ripe medium avocados, pitted, peeled, and sliced into 1/2-in. wedges 
Grated parmesan for serving (optional)

Easiest part of the recipe accomplished!

Instructions

Preheat oven to 450. 
Coat avocado slices in the four, then egg, then panko. Spread on a cooling rack that has been sprayed with non-stick spray, then place on a cookie sheet.  Spray the top of the wedges with olive oil and sprinkle with salt, then bake for about 20 minutes at 450, or until they are golden brown (I turned my oven up to 500 for the last 5 minutes).

How it went

Assembly-line style: Flour to egg to panko.
 I started off by assembling all the ingredients, I’d even bought kosher salt for this recipe (and many others I’m going to try for this blog). I had plain bread crumbs from Giant Eagle and figured those would sub for panko, nicely. 

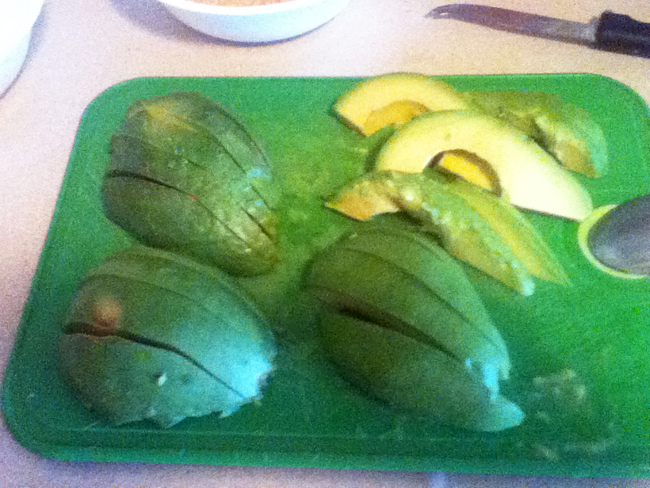
“2 firm-ripe medium avocados, pitted, peeled, and sliced into 1/2-in. wedges.” Each avocado ended up yielding about 10 slices for me. I guesstimated instead of measuring so my wedges weren’t uniform. 

Bald patches on my avocado fries.
“Coat avocado slices in the four, then egg, then panko.” This one got a little messy (I’m starting to think it might be me). Avocados are slick to begin with, and the flour/egg/bread crumb combo seemed to get a little tricky. I arranged everything assembly-line style, and started by hand. That ended up with my paws covered in flour, egg and breadcrumbs. I tried to use a fork. That ended up with my hands slightly less covered in flour, egg and breadcrumbs, but kind of ended up breaking one of my avocado slices in half. I tried using tongs and that didn’t help. I ended up using a fork/hand combo that seemed to work for me. The other problem I encountered here was getting everything to coat evenly on the avocados. I seemed to be brushing off flour, and then it would clump on the avocado slices awkwardly then fall off in the egg. I ended up with slices that had patches where the coating didn’t take.
First batch ready to bake.

“Spread on a cooling rack that has been sprayed with non-stick spray, then place on a cookie sheet.” I actually don’t own a cooling rack. I do own a toaster oven though. And that toaster oven has a mini-oven rack that I can pull out. I used that as my makeshift cooling rack. It’s not terribly large, so I did my avocados in two batches. I failed to spray the rack on the first batch. (Spoiler alert: You should spray the rack.) 

I knew I should have checked them sooner.
“Spray the top of the wedges with olive oil and sprinkle with salt.” I actually didn’t have spray olive oil and couldn’t find a reasonably priced can when I went looking in the grocery store, so I just went with a light dusting of canola oil, to get my light dusting of salt to stick. 

“Bake for about 20 minutes at 450, or until they are golden brown.” My oven runs hot, which I found out when I baked blueberry cheesecake cookies, so I turned it down to about 425 and put them in. I checked them at 17 minutes and they got a little darker than I would have liked. I wished I’d checked them a minute or two earlier. 

Results


Burnt but still edible.
Pulling my slightly burnt pieces off the rack ended up breaking them in half a few times, which I'm sure could have been avoided with some cooking spray.

I waited a minute or two for them to cool enough to not scald my tongue and dug in. They have a great crunch on the outside and a real creamy inside. They easily fall apart though so be careful. I enjoyed them all right with the Parmesan cheese sprinkled on top, but I thought they would do well with a much bolder spice, like red pepper or Cajun seasoning.


Second batch, a little more appetizing, a lot less burnt.
My second batch I sprayed the rack and they came out much easier. I also added Cajun seasoning to the salting portion of the recipe. I cooked the second batch for about 15 minutes after nudging my oven down a hair from 425 degrees. My tweaking resulted in a much less burnt version of the avocado fries. This appetizing plate was calling me. I enjoyed this batch without parmesan more. The Cajun spices blending well with avocado, but I think you could season to your taste with any number of different spices. I’m not a big parmesan cheese fan (it’s not even in my top three white cheeses), so those who are more into its flavors might enjoy that seasoning better than my Cajun version.

Second batch turned out well and tasty.
I definitely recommend them for taste, but it’s a bit of a hassle as a recipe and quite messy. I think it’s a versatile recipe with lots of potential variations, but it’s not going to be one I bust out a lot. But if you’re looking for a fried food alternative and you’re an avocado fan, this should definitely be in the mix.


— Nicole Franz | NiFranz@News-Herald.com | @FranzOrFoe
Follow my Mission: Pinpossible board on Pinterest.

Labels: , ,

Wednesday, August 1, 2012

Pesto crescent rolls is messy, easy recipe

First off, there’s nothing like clicking on a pin and going through to the website it links to and realizing this website is most definitely not in English. The pin that inspired this post, took me to this website, which is written in Turkish. Lucky for me, there was a handy-dandy translate button at the top of the page where Google would translate it for me.

The website and the pin have different instructions. The website, once translated into something I can (mostly) read, is for a from-scratch roll. 
 
Because my blog is based on Pinterest and figuring out whether the things found on there work, I opted for the instructions on the pin.

Instructions

“basil pesto - press out crescent roll dough. spread pesto. roll up into a log. slice. place in a pie plate like cinnamon rolls. try not to eat the whole pan.”

How it went

Simple enough.

I used Pillsbury Crescents and Knorr pesto sauce mix. 

I decided it would make sense to start by making the pesto sauce. I love pesto but had never made it until embarking on this recipe. I followed the instructions on the mix packet to the letter and the result was this lovely green sauce that kind of looks like it would be at home in a witch’s cauldron but tastes delicious. 
 
Now for the “press out crescent roll dough” part. I arranged the triangular pieces of dough by hand in a rectangle and used by fingers to press the edges together as best I could. I imagine a rolling pin might have been helpful but I don’t have one. My edges weren’t perfect which made things even messier later. 

“Spread pesto.” Something easy, I supposed. I spooned out a big glob of pesto sauce and spread it around with the spoon. Then I added some more and continued swirling it around until I was satisfied the dough was properly covered with pesto.

“Roll up into a log.” This is where things got a bit ugly. I know I’m a messy cook. Always have been, but this got a little extreme, even for me because the dough wasn’t very well pressed together. The dough started to come apart as I was rolling it up by hand. To add to the mess, it seems that I had gone a bit overboard on the pesto sauce, because this thing was hemorrhaging pesto. My hands got covered in pesto, which explains why this shot is blurry (I only cleared off one hand to take the shot of the rolled mess).

“Slice.” Not very specific, eh? I went with slices about an inch wide, and, wow, was this another messy experience. I was using a slightly serrated knife, and it was very difficult to cut the roll cleanly. I ended up with 11 of these kind of ugly, awkward looking pieces of dough.

“Place in a pie plate like cinnamon rolls.” I guess I missed the memo about how cinnamon rolls are placed in a pie plate. I just kind of spaced them evenly apart in the pie plate. Only later did I realize, the instructions probably meant to place the dough a little more tightly together, slightly touching so when it puffed up during baking they’d be touching and pulled apart.

Skipped instructions — the pin neglects to give any sort of baking instructions so I decided to go with the Pillsbury Crescent rolls’ baking instructions (375 degrees for 11-13 minutes). I ended up with these gorgeous golden brown crescent rolls in about 11 minutes. They look pretty awesome if I do say so myself.


“Try not to eat the whole pan.” I waited a bit to let them cool off before I tried one. It was pretty darn delicious, but I don’t think the pesto flavor was very strong. It was too subtle for my personal tastes. To up the pesto flavor, I dipped the pesto crescent roll into the pool of pesto sauce left on the pan where I rolled it all up in the sloppiest way a person could probably manage. This helped increase the pesto flavor.

Hindsight

  • Probably should have used less of the sauce when I was rolling it out to prevent the total mess from oozing all over the place.
  • Probably would have been better with a stronger pesto sauce, perhaps made from fresh basil.


— Nicole Franz | NiFranz@News-Herald.com | @FranzOrFoe | Follow my Mission: Pinpossible board on Pinterest.

Labels: ,